regroove
October 02, 2021

About
Regroove is a Max for Live device that generates and applies expression to drum patterns using a learned understanding of rhythm and groove. The characteristics of groove learned by the embedded neural network encapsulate dynamics, microtiming, and syncopation and is ultimately based on many hours of drum rhythms played by session drummers on a 9-piece electronic drum kit. We wanted to avoid making yet another random pattern generator so a focus has been put on enabling interactivity and leveraging the rhythmic understanding of the embedded neural network to generate customized, musical variations on any input pattern. This documentation exists to help you understand how you can use the device to find your rhythms and grooves!
Getting Started
You will need Max 8.3 or higher to run the Max for Live device; if you have an up-to date version of Live 11 (at the the time of writing this is 11.2.7) this should be the default. If you're using Live 9 or 10, follow the official Ableton instructions to make sure Live is using a valid version of Max. When this requirement is satisfied, simply open up Ableton, double click the .amxd device or drag it into a MIDI track. Once the default parameters appear, the device is loaded and you're ready to jam!
As tempting as it seems to ignore the setup instructions, please don't. If you try to use Regroove with an outdated version of Max, you will likely crash Ableton and get frustrated or even lose existing work. Neither of us want that to happen so make sure Live is using the latest version of Max and this won't happen, just take the 5 minutes and do it.
It's normal that it takes a few moments for the device to initialize, the actual load time depends on your OS and RAM size. Our tests reveal an average of 30 seconds on Windows 10+ and an average of 10 seconds on MacOS. We are aware that most Max for Live devices do not suffer such long loading times, however this is difficult to avoid for Regroove as we have to load large neural networks into memory.
Pattern Matrix
The pattern matrix represents a 9-by-16 grid of 16th notes, from top to bottom each of the rows represent the different drum heads in a drum kit. The pattern matrix is fully interactive, this means the notes in the matrix are clickable and toggling a note will activate or deactivate it for playback whilst also sending this information to the backend. This allows you to quickly interact with and manipulate your patterns. Additionally, when operating with an activated sync mode, the pattern matrix will always display the currently playing pattern meaning you will be able to observe the patterns generated by the neural network in real-time.
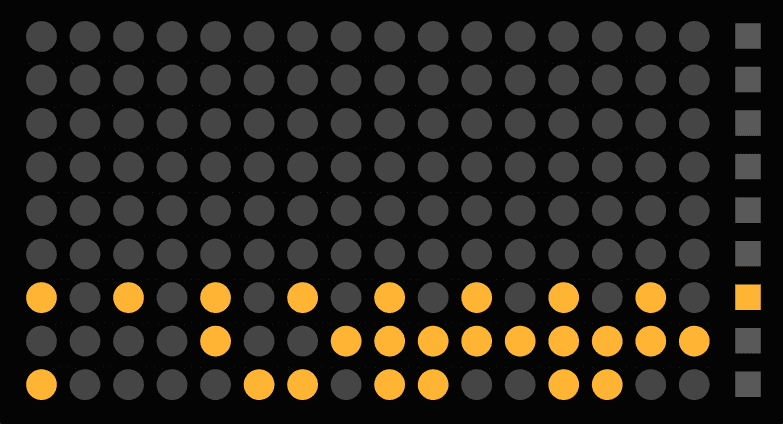
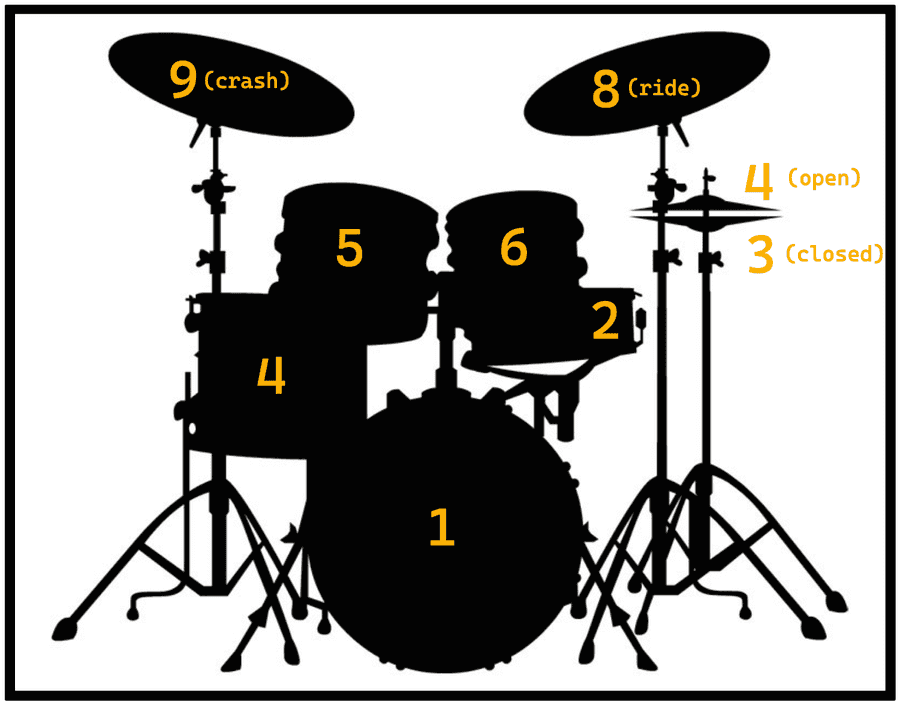
Currently, the order that the drum heads appear in is fixed, this is because the neural network has been trained to associate each row index with a specific drum head. However, the device does offer ways to customize which sound is triggered for each drum head. At the end of each row you will notice a square toggle button, clicking this allows you to enter Detail Mode which exposes an interface for you to set parameters specific to each drum head (see figure below). At the top left of this view, you can set the target MIDI note. The default MIDI mapping is based on several factory drum kits provided by Live and other VSTs, however it might happen that you're target instrument might have different drum mappings. There's also a sync button, deactivating this "locks" the current pattern for the current drum head so that future sync actions do not modify this pattern. For example, you might want to lock your kick to a four-to-the-floor whilst the other instruments are getting syncopated. There are several other parameters that can be set for each drum head, these are explained in further detail in the Detail Mode section.
Besides modifying notes directly by clicking, the pattern matrix allows you to load a MIDI file directly by dragging and dropping. First locate the MIDI file of interest in the Ableton browser and drop it in (Ableton does not offer the ability to drop MIDI files directly from your native file management system). Unfortunately it's also not possible to drop MIDI clips directly from the Ableton session into Regroove, although they look like MIDI files they actually are not encoded in the way and are not saved to disk. If you want to use an existing MIDI clip you have two options. The first is to export the clip to a MIDI file and drag it in from the file browser as specified above. Secondly, Regroove allows you to record MIDI input directly from files playing in the same MIDI track as Regroove. When the record button is toggled, any incoming MIDI input will be automatically recorded into the pattern matrix.
Note these methods of input only work perfectly if the note mapping between the MIDI file or MIDI clip and the pattern matrix is the same. Since different VST drum kits offer different MIDI note mapping, there is a good chance that there is some inconsistencies between the target MIDI file and the current MIDI output setup. If you absolutely must use this MIDI file, you can always set the correct MIDI notes for each drum head in Detail Mode. Secondly, although MIDI files of any length can be dropped in the active area, only the first measure of a MIDI clip will be parsed since Regroove can only handle and display one input measure at a time.
Neural Engine
With an input pattern defined, we can start thinking about running the neural engine. The neural engine is powered by an embedded neural network which generates patterns based on the pattern displayed in the matrix and the parameters specified in the engine pane. In the background, we are actually just asking the model to generate a new set of patterns and storing them in memory. This means that the patterns in memory are not automatically updated when you adjust the engine parameters in this space, when you want to have a different set of patterns you need to explicitly re-generate them. This also means that you probably won't be interacting much with this pane in real-time. This configuration step can be compared to having a conversation with your drummer before a session starts; you would start by telling her what kind of rhythm you like, how much variation she should play on top of this rhythm, and how complex the variations should be. When configured properly, your drummer will lay down the right groove allowing you to focus on your own instrument or other parts of the arrangement.
-
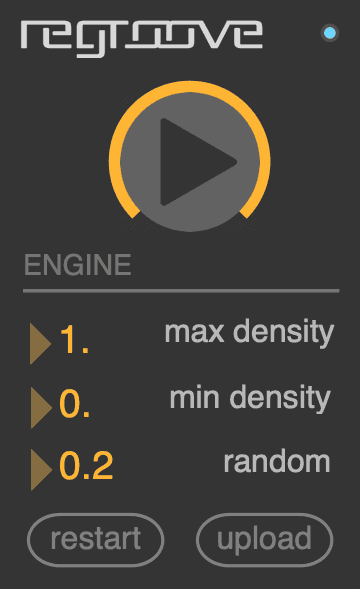
Density is defined as the total number of notes played in a one-bar rhythm. Minimum and maximum density together determine the range of densities that can be expected in the patterns generated. Note that these density values are interpreted relative to the input pattern, in other words the average density is ultimately defined by the input pattern. Alternatively, this can be interpreted as complexity, the more notes that exist in a drum pattern the greater the complexity.
-
Random determines the amount of variation present in the patterns generated, as compared to the input pattern. This can be abused in many ways, if you're looking for chaos and crazy drum solos or fills, increase the random value. However, if you want controlled, minor syncopations of your input pattern, keep this value below 0.25.
Lastly, the engine pane offers a way to restart the device in case of a full meltdown (which shouldn't happen but you never know). There's a small light in the top right of this pane which indicates if the neural engine is running or not, if this is red you have to restart the device as the neural engine has crashed. You can restart the device whenever you want, so if you're experiencing any weirdness or unexpected behavior with the device, try restarting it. Note that if you restart all patterns in memory will be lost. Lastly, there's an upload button which is currently deactivated, in the future this will be used to upload neural groove models trained on different data.
Expression
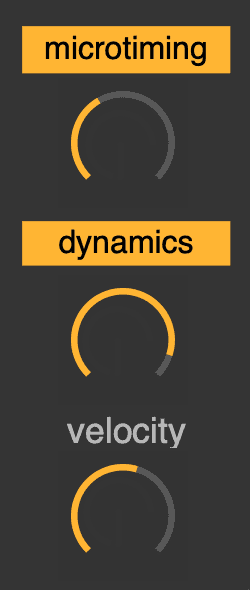
One aspect of rhythmic expression is how microtiming and dynamics can be used to enhance a groove, its heavily intertwined with rhythm and tempo. The neural network has learned to ignore tempo and focus on which rhythms are typically associated with certain expression patterns. When we condition the neural engine with our input pattern, the neural network makes a prediction as to what it thinks are appropriate expression patterns for the dynamics and microtiming of each rhythmic pattern generated. The expression pane offers a way to globally modify the amount of microtiming and dynamics applied to the pattern that's playing. The neural engine is only able to provide a single static prediction as to what the expected groove profile should be, the dials presented in this pane allow you to fine-tune that prediction to suit the groove of your track. We do this because, although the predictions may fit very well in a certain kind of music or a certain tempo, this isn't always the case when extrapolating to any music. Nonetheless we encourage you to try to and find the sweet spot of rhythm, expression, and tempo - it may take a minute but in the end it's a groove that will keep you locked in for days.
Although the groove predictions provided by the groove engine can be very useful, sometimes it can be hard to find exactly what you're looking for. Even if the groove pattern is almost exactly what you want, almost just doesn't cut it for an infectious groove. We already exposed Detail Mode above, if you re-enter detail mode for a drum head of choice you will be able to visualize and fine-tune the microtiming and dynamics pattern for this drum head.
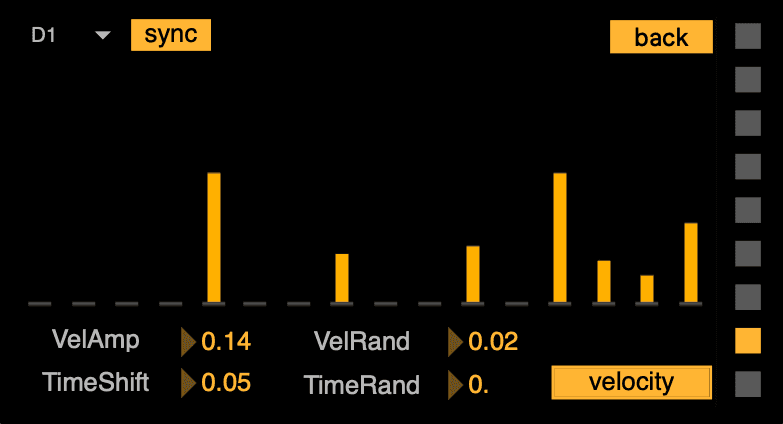
At the bottom left there are four parameters, each of these parameters acts exlusively on the notes present for this drum head.
VelAmp - Amplifies the velocity by a percentage of the existing velocity. The output is scaled non-linearly but ultimately acts to preserve the existing velocity pattern as much as possible.
TimeShift - Shifts the time linearly forwards or backwards. The maximum amount of shift possible is a 1/32th note, if we allow shifting more than that it would be considered as being part of the next or previous 16th note. Since we can shift forward or backward, this is like swing on steroids.
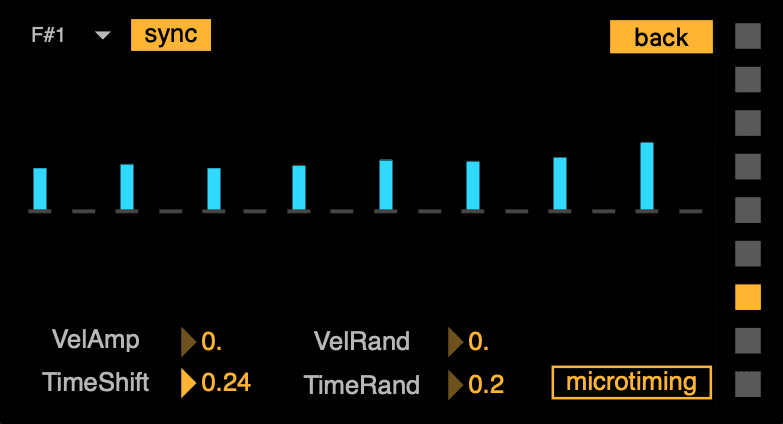
VelRand - Randomizes the velocity. This increases or decreases the velocity on a per-note basis meaning you can get pretty wonky patterns.
TimeRand - Randomizes the microtiming. This increases or decreases the microtiming on a per-note basis meaning you can get even wonkier timing patterns.
In the diagram above, the bars displayed represents the velocity values of each of the notes played on this drum head. To view the microtiming values simply click the "Velocity" button in the bottom right. To exit, Detail Mode you can click the back button in the top right of the pane.
Syncopation
The final pane, all the way on the right, is your portal to syncopating the patterns in a way that suits your workflow. Here we allow you to modify the ways that the notes in the pattern interact with one each other to form a musical groove - this can be manipulated by injecting syncopations and density variations. Besides the pattern matrix, you will probably spend most of your time jamming in this pane.
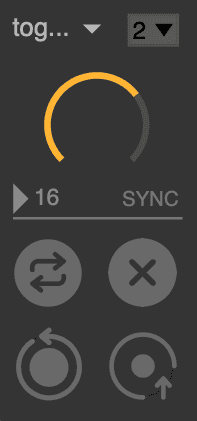
At the top of the pane, you will see two dropdown menus, the first allow you to pick the "sync mode" which is the way that the syncopation is applied to the pattern, more detail on each sync mode below. If you've picked auto sync mode, you can use the second dropdown to pick the interval at which the syncopation is applied. Below this is the density dial, this can be used to dial in the density of the patterns that will be sampled from the neural engine to populate the pattern matrix. Before we get to the quadrant of control buttons, there's a loop length parameter that can be used to control the length (in 16th notes) of the pattern that will be looped over.
If you're in snap or toggle mode, the quadrant buttons at the bottom of the pane is how you control when to syncopate and update patterns in the pattern matrix. The sync button is used to sample a new pattern (with the density specified in the density dial) from the neural engine. This will probably be used most often for injecting fills or simply exploring the patterns generated. The previous button lets you traverse through the history of patterns that have been sampled from the neural engine. This is useful in case you were too slow to lock into a pattern you liked or maybe you're already a few patterns in before you realize that you want to switch back to a previous pattern. The input button allows you to return to the pattern that was used to condition the neural engine. Perhaps you don't like the patterns generated by the neural engine but you want to keep the same input, you can easily cycle back and re-run the engine to get something different. Lastly, the clear button clears the pattern matrix.
-
snap will syncopate the active pattern each time you trigger the sync button. Whether you're looking for fills or want to see the kind of patterns generated by a specific engine configuration, this is a nice way to manually explore the patterns generated by the neural engine.
-
auto will syncopate the active pattern at a given interval. The syncopation interval can be set using the number dropdown in the top right corner of the pane. Currently we only offer naive automation intervals (1, 2, and 4 bars). This is a great setting if you want the device to accompany your playing as it will continuously inject variations into your drum patterns.
-
toggle, our personal favorite, will syncopate the active pattern only while holding the trigger button. Upon releasing the trigger, the active pattern will snap back to the initial pattern. This mode is great if you want to spice up an existing rhythm with some sparse or manually timed syncopations or fills.
Issues
We try our very best to present a device that works without any flaws, however with any complex software it's difficult to achieve perfection. We are always on the lookout for bugs, flaws, or new features, since you as the users are spending the most time with Regroove we encourage you to submit your feedback. We currently monitor for issues on the GitHub project associated with the device, so if anything comes up please go to regroove-m4l and check if someone else had this issue before or submit a new issue.